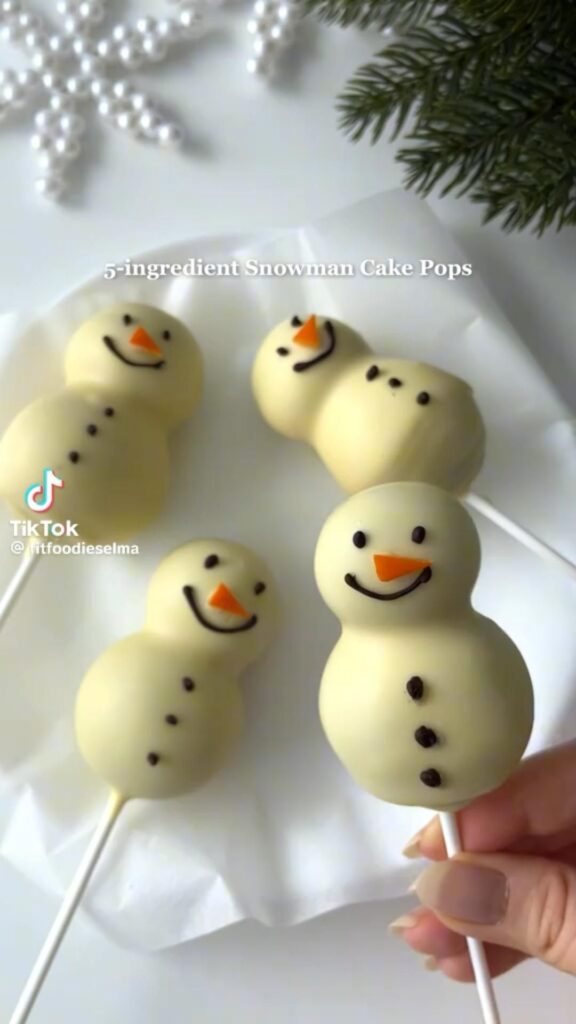
Snowman cake pops on a white plate are the highest-impact winter dessert you can make for the effort involved. You bake one 9×13 inch vanilla cake, crumble it into 3 cups (300g) of fine crumbs, bind it with 1/2 cup (120g) cream cheese frosting, and shape 24 balls. The white plate matters: a plain white surface removes visual noise and makes the white chocolate shells and orange carrot noses read clearly from 10 feet away at a party table.
Advertisements1
The numbers that matter: 15 minutes of prep, 35 minutes of active work including chilling and dipping, 24 pops from one batch, and roughly 285 calories per two-pop serving. The failure point in 90 percent of cake pop batches is temperature, not technique. Cake balls above 68F (20C) slide off the stick, and chocolate above 110F (43C) blooms and streaks. Control those two numbers and the batch works.
Below is the exact method I use, including the double-dip technique that gives the shell a smooth 2mm coat instead of a lumpy one, plus storage data for fridge and freezer so you can make them 3 weeks ahead.
Why You'll Love This Recipe
About the Ingredients
1 box (15.25 oz / 432g) vanilla cake mix, plus eggs, oil, and water called for on the box
Use any white or yellow cake mix. Substitution: one 9×13 inch scratch vanilla cake works identically, just cool it fully first.
1/2 cup (120g) cream cheese frosting, chilled
Buy the shelf-stable tub kind, not the whipped variety, which is too airy to bind. Substitution: 1/2 cup (120g) vanilla buttercream works but adds about 15 calories per pop.
24 oz (680g) white chocolate melting wafers
Melting wafers set harder and shinier than white chocolate chips, which contain stabilizers that resist flowing. Buying tip: check the bag says 'compound coating' or 'candy melts' for the smoothest dip.
24 lollipop sticks, 6 inch (15cm)
Paper sticks absorb moisture and soften. Substitution: 4 inch (10cm) sticks work if you plan to serve them standing in a foam block rather than on the plate.
2 oz (56g) orange candy melts or orange fondant
For 24 carrot noses you need roughly 1/4 teaspoon of material each. Substitution: a small peeled carrot cut into 1/4 inch (6mm) slivers works and looks sharper.
3 oz (85g) dark chocolate melting wafers
Used for eyes and the smile. Substitution: black candy melts or a food-safe black edible marker, which is faster but less precise.
1 tablespoon (12g) vegetable shortening, optional
Stir into the white chocolate if it coats thick. Substitution: coconut oil in the same quantity, which thins identically but sets slightly softer.
1/4 cup (30g) powdered sugar, for dusting the plate
Creates a snow effect under the pops and stops them sliding. Substitution: desiccated coconut, which gives more texture but reads less like snow.
Tips & Tricks
Chill Before Sticking
Insert sticks into cake balls that have spent 20 minutes in the freezer, not the fridge. Cold cake grips the chocolate instantly and stops the slide-off failure.
Melt in 30-Second Bursts
White chocolate scorches above 115F (46C) and turns grainy. Microwave in 30-second intervals, stirring each time, and stop when 80 percent of the wafers are melted.
Tap, Do Not Shake
After dipping, tap your wrist with your other hand 3 or 4 times. Shaking creates air bubbles in the shell; tapping lets excess chocolate fall in a clean sheet.
Work in Batches of 6
Dip 6 pops, decorate, then start the next 6. White chocolate skins over in about 90 seconds, and decorations stop adhering after that.
Pro Tips
Step-by-Step Instructions
1. Bake and cool the cake
Bake the cake mix in a greased 9×13 inch pan at 350F (175C) for 24 to 28 minutes, until a toothpick inserted in the center comes out clean and the top springs back when pressed. Cool completely in the pan, about 45 minutes, because warm cake steams and turns the mixture gummy.
2. Crumble into fine crumbs
Break the cooled cake into a large bowl and rub it between your fingers until no piece is larger than a pea. You should have about 3 cups (300g) of crumbs. Large chunks are the number one cause of cracked cake pops.
3. Bind with frosting
Add 1/2 cup (120g) chilled cream cheese frosting and mix with a sturdy spoon until the mixture holds together when squeezed. Stop the moment it clumps; over-mixing makes the balls dense and greasy.
4. Scoop and roll 24 balls
Scoop 1.5 tablespoon (30g) portions and roll into smooth balls with your palms. Place on a parchment-lined sheet and freeze for 20 minutes, or refrigerate for 45 minutes, until firm but not frozen solid.
5. Insert the sticks
Dip the tip of each stick in melted white chocolate, then push it halfway into a chilled ball. The chocolate acts as glue. Return the pops to the freezer for 10 minutes to set the stick in place.
6. Melt the coating
Melt 24 oz (680g) white chocolate wafers in a deep mug in 30-second microwave bursts, stirring between each, until smooth at 100 to 110F (38 to 43C). Stir in 1 tablespoon (12g) shortening if the coating looks thick. A deep mug gives you enough depth to submerge each pop in one motion.
7. Dip and tap
Dip each pop straight down until the coating reaches the stick, lift, and tap your wrist 3 to 4 times to shed excess. The shell should look glossy and even, about 2mm thick, with no bare patches.
8. Decorate as snowmen
While the coating is still wet, press an orange nose into the center. Pipe two dark chocolate dots for eyes and a 3-dot smile below. Work in batches of 6 so the coating stays tacky enough to hold the decorations.
9. Set and plate
Stand the pops in a foam block or lay them on parchment at room temperature for 15 minutes, until the shells are fully hard and the surface is dry to the touch. Dust a white plate with 1/4 cup (30g) powdered sugar and arrange the snowmen upright.
Delicious Variations
Chocolate Snowmen
Swap the white wafers for 24 oz (680g) dark chocolate and dust the plate with cocoa powder instead of sugar for a 'snow at night' look.
Coconut Snowmen
Roll each dipped pop in 1/2 cup (40g) desiccated coconut before the coating sets, which adds texture and hides any uneven dipping.
Red Velvet Snowmen
Use a red velvet cake mix and cream cheese frosting, then coat in white chocolate. The cut surface at the stick shows a red core, which photographs well.
How to Store Snowman Cake Pops on a White Plate
Refrigerator
Store finished pops in a single layer in an airtight container in the refrigerator for up to 5 days. Condensation forms if you seal them warm, so cool fully first.
Freezer
Freeze undipped cake balls on a sheet for 2 hours, then transfer to a zip-top bag for up to 2 months. Dipped pops freeze for up to 1 month; thaw in the refrigerator for 4 hours before serving.
Reheating
Do not reheat. Cake pops are served cold or at room temperature. If the coating has softened, 5 minutes in the refrigerator restores the snap.
Frequently Asked Questions
Q: Why do my cake pops fall off the stick?
The cake balls are too warm or too heavy for the stick. Freeze them for 20 minutes before inserting the sticks, and dip the stick tip in melted chocolate first so it bonds to the cake. A 30g ball is the practical maximum weight for a 6 inch stick.
Q: Can I make snowman cake pops ahead of time?
Yes, up to 3 weeks ahead if you freeze them undipped. Shape and freeze the plain cake balls, then dip and decorate within 2 days of serving. Fully decorated pops hold in the refrigerator for 5 days.
Q: How do I melt white chocolate without it seizing?
Keep it under 115F (46C) and never add water. Microwave in 30-second bursts, stirring each time, and stop when 80 percent of the wafers are melted, letting residual heat finish the job. If it seizes, stir in 1 teaspoon of shortening, not water.
Q: How many cake pops does one cake mix make?
One 15.25 oz (432g) box of cake mix yields 24 pops at 1.5 tablespoon (30g) each. If you scoop smaller 1 tablespoon portions you get 34 to 36 pops, but they are harder to decorate as snowmen.
Q: What can I use instead of candy melts for the coating?
White chocolate chips work but need 1 tablespoon of shortening per 12 oz to thin them. Almond bark is the closest match to candy melts and sets the hardest. Avoid white baking chips labeled 'white chips,' which contain no cocoa butter and taste waxy.
Make one batch this week and freeze half the undipped balls for a second round later. Once you have the chill-and-tap rhythm down, this becomes a 50-minute project you can run on autopilot. Keep it simple, keep it growing.
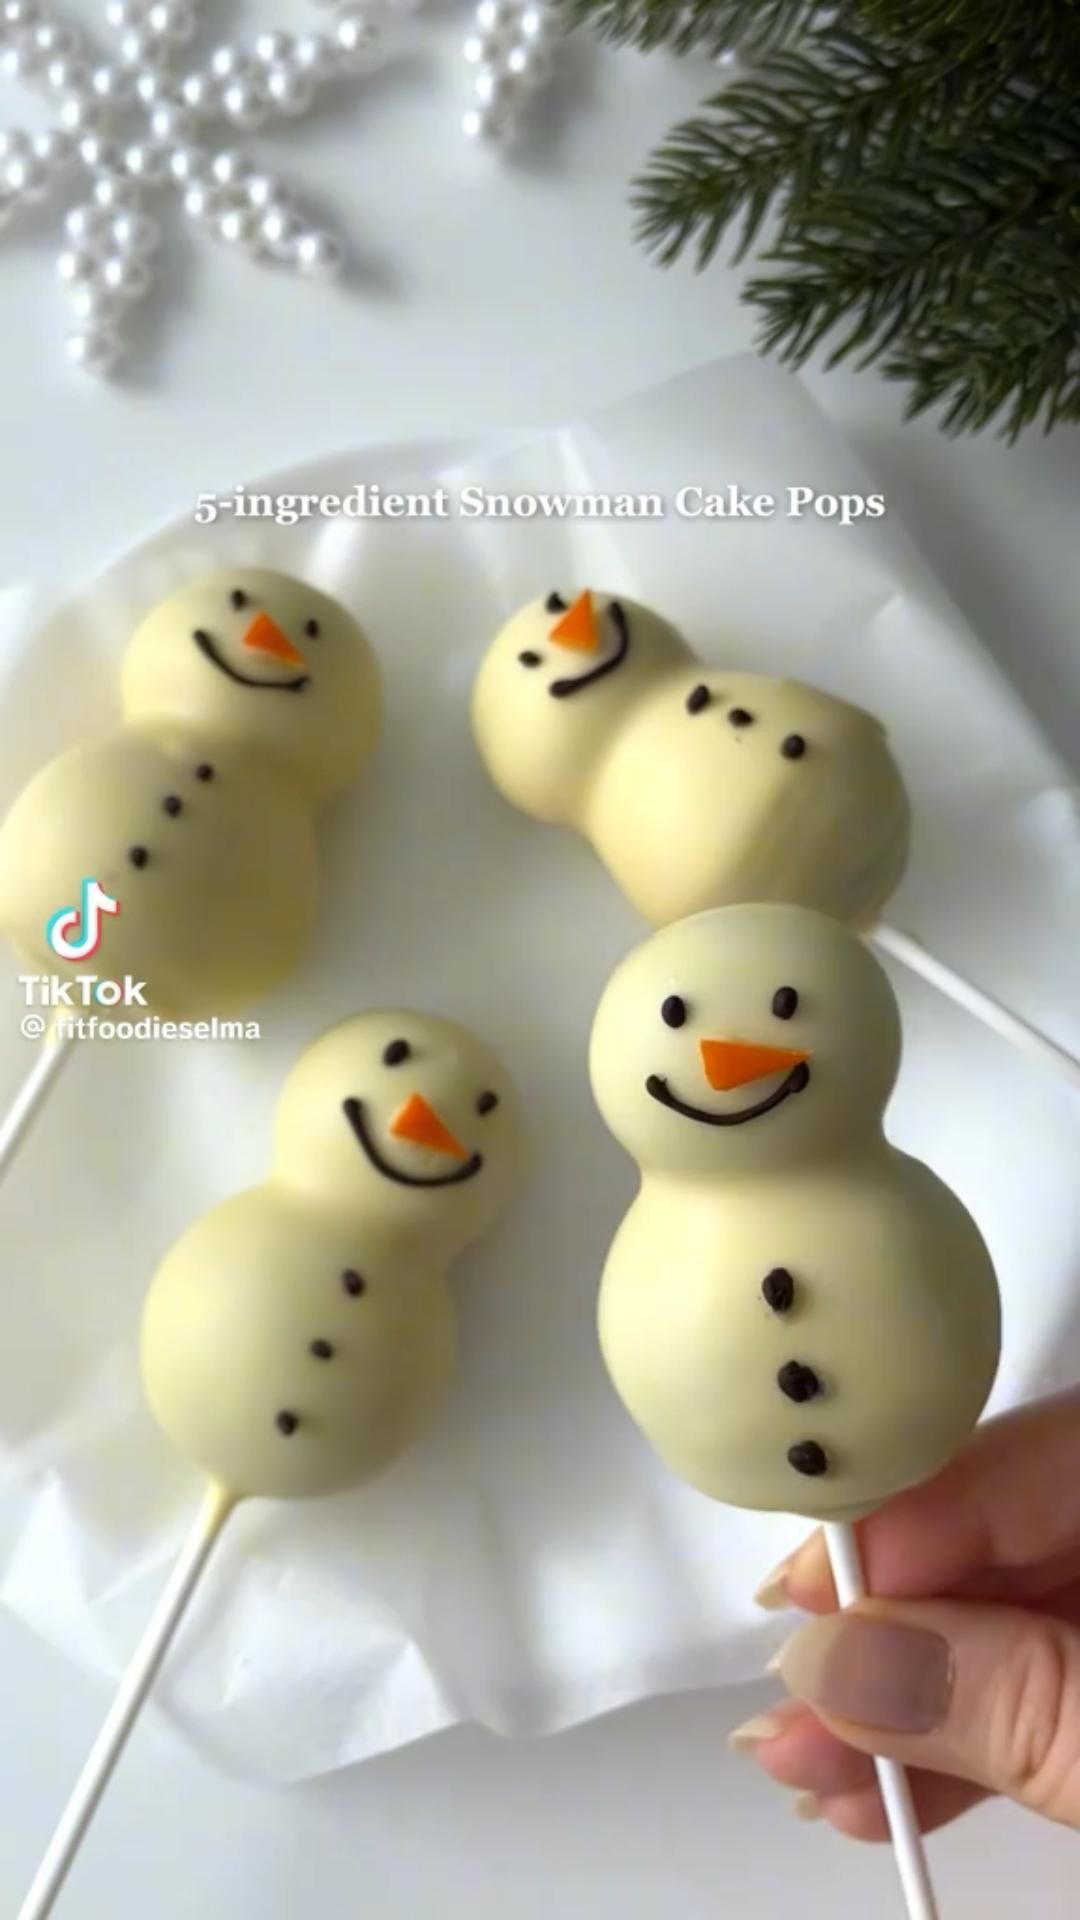
Snowman Cake Pops on a White Plate
Snowman cake pops on a white plate: moist vanilla cake wrapped in white chocolate, decorated as snowmen, for a show-stopping winter dessert.
🧂 Ingredients
- 1 box (15.25 oz / 432g) vanilla cake mix, plus eggs, oil, and water called for on the box
- 1/2 cup (120g) cream cheese frosting, chilled
- 24 oz (680g) white chocolate melting wafers
- 24 lollipop sticks, 6 inch (15cm)
- 2 oz (56g) orange candy melts or orange fondant
- 3 oz (85g) dark chocolate melting wafers
- 1 tablespoon (12g) vegetable shortening, optional
- 1/4 cup (30g) powdered sugar, for dusting the plate
📋 Instructions
- 1Bake and cool the cake — Bake the cake mix in a greased 9×13 inch pan at 350F (175C) for 24 to 28 minutes, until a toothpick inserted in the center comes out clean and the top springs back when pressed. Cool completely in the pan, about 45 minutes, because warm cake steams and turns the mixture gummy.
- 2Crumble into fine crumbs — Break the cooled cake into a large bowl and rub it between your fingers until no piece is larger than a pea. You should have about 3 cups (300g) of crumbs. Large chunks are the number one cause of cracked cake pops.
- 3Bind with frosting — Add 1/2 cup (120g) chilled cream cheese frosting and mix with a sturdy spoon until the mixture holds together when squeezed. Stop the moment it clumps; over-mixing makes the balls dense and greasy.
- 4Scoop and roll 24 balls — Scoop 1.5 tablespoon (30g) portions and roll into smooth balls with your palms. Place on a parchment-lined sheet and freeze for 20 minutes, or refrigerate for 45 minutes, until firm but not frozen solid.
- 5Insert the sticks — Dip the tip of each stick in melted white chocolate, then push it halfway into a chilled ball. The chocolate acts as glue. Return the pops to the freezer for 10 minutes to set the stick in place.
- 6Melt the coating — Melt 24 oz (680g) white chocolate wafers in a deep mug in 30-second microwave bursts, stirring between each, until smooth at 100 to 110F (38 to 43C). Stir in 1 tablespoon (12g) shortening if the coating looks thick. A deep mug gives you enough depth to submerge each pop in one motion.
- 7Dip and tap — Dip each pop straight down until the coating reaches the stick, lift, and tap your wrist 3 to 4 times to shed excess. The shell should look glossy and even, about 2mm thick, with no bare patches.
- 8Decorate as snowmen — While the coating is still wet, press an orange nose into the center. Pipe two dark chocolate dots for eyes and a 3-dot smile below. Work in batches of 6 so the coating stays tacky enough to hold the decorations.
- 9Set and plate — Stand the pops in a foam block or lay them on parchment at room temperature for 15 minutes, until the shells are fully hard and the surface is dry to the touch. Dust a white plate with 1/4 cup (30g) powdered sugar and arrange the snowmen upright.

Liam covers personal finance and investing for beginners, demystifying money management with clear, no-nonsense advice. He focuses on budgeting, saving, and long-term wealth building, often using real-life scenarios to illustrate concepts.