Every December my grandmother's kitchen in Minnesota smelled of vanilla cake and melted white chocolate, and the counter filled with little snowmen on sticks waiting for their candy scarves. Snowman cake pops are the Christmas dessert I make first each year, because they take leftover cake, a bowl of frosting, and a bag of white candy melts and turn them into something people photograph before they bite.
Advertisements1
The magic is in the chill. Crumbled cake bound with just enough frosting rolls into truffle-smooth balls, firms up in the refrigerator, then gets dipped in white chocolate that snaps like fresh snow when you bite through. You do not need a candy thermometer, a stand mixer, or any baking skill at all.
I have made these in tiny apartment kitchens and in borrowed vacation rentals, and the method never changes: crumble, bind, chill, dip, decorate. Whether you serve them at a school bake sale, a Christmas Eve table, or tucked into a tin as a gift, they carry the season with them. Go, see, and connect.
Why You'll Love This Recipe
About the Ingredients
4 cups (about 400g) crumbled vanilla or yellow cake, from a 9×13-inch baked cake or store-bought pound cake
Any moist cake works, but avoid very light angel food cake because it will not bind. A grocery store pound cake is the fastest shortcut and tastes rich.
3/4 cup (180g) cream cheese frosting, plus 1 to 2 tablespoons if needed
Canned frosting is intentionally thick and holds the balls together better than homemade buttercream. If you only have buttercream, chill it for 30 minutes first.
12 ounces (340g) white candy melts or white chocolate melting wafers
Candy melts flow thinner and set shinier than chocolate chips, which seize easily. If using white chocolate bars, chop them finely and add 1 teaspoon coconut oil.
24 to 30 lollipop sticks (6-inch)
Paper straws cut in half work in a pinch, but they bend under the weight of a large pop. Buy sturdy sticks with a flat end so the pop does not spin.
2 tablespoons orange candy melts or orange fondant, for carrot noses
A tiny wedge of dried apricot or a sliver of orange Starburst works if you cannot find orange candy. Roll fondant into 1/4-inch cones and let them firm up.
1/4 cup (45g) mini chocolate chips, for eyes and buttons
Regular chocolate chips are too large and heavy for a 1.5-inch head. If you only have standard chips, press them in point-first and chill firmly.
1/4 cup (30g) red or green fruit leather or sour straws, for scarves
Fruit leather cuts into thin scarf strips that stay soft. In a pinch, pipe thin lines of melted red candy melts across the neck with a zip-top bag.
1 teaspoon coconut oil or shortening, for thinning the coating
Shortening keeps the coating glossy and helps it flow around the pop. Do not use butter, which adds water and makes the coating streaky.
Tips & Tricks
Chill before dipping, always
Warm cake balls slide off the stick and crack the coating. Freeze them 15 minutes until firm but not rock hard.
Do not over-mix the cake
Stop mixing as soon as the crumble holds together when squeezed. Overworked cake turns to paste and the pops taste dense.
Tap, do not shake
After dipping, tap your wrist gently so excess coating drips off. Shaking flings the pop off the stick and leaves a lopsided snowman.
Work in small batches
Keep undipped balls in the refrigerator while you decorate. Warm pops lose their shape the moment they hit the chocolate.
Pro Tips
Step-by-Step Instructions
1. Crumble the cake
Break the cake into a large bowl and rub it between your fingers until no piece is bigger than a pea. You want an even, sandy crumb so the pops roll smooth.
2. Bind with frosting
Add 3/4 cup frosting and mix with a sturdy spoon until the mixture holds when you squeeze a handful. If it crumbles, add frosting 1 tablespoon at a time.
3. Roll the balls
Roll 1 1/2-tablespoon portions into balls, about the size of a walnut, and place them on a parchment-lined tray. You should get 24 to 30 balls.
4. Chill until firm
Refrigerate the tray for 30 minutes, or freeze for 15 minutes, until the balls feel firm and cool to the touch. A soft center is the number one reason pops fall apart.
5. Melt the coating
Melt the white candy melts in a microwave-safe bowl in 30-second bursts, stirring between each, until smooth at about 110 F to 115 F (43 C to 46 C). The coating should ribbon off the spoon without lumps.
6. Insert the sticks
Dip the tip of each lollipop stick about 1/2 inch into the melted coating, then push it halfway into a chilled ball. Return the tray to the refrigerator for 10 minutes to set the glue.
7. Dip the snowmen
Dip each pop straight down into the coating until the ball is fully submerged, lift, and let the excess drip back into the bowl. Tap your wrist gently and stand the pop upright in a styrofoam block.
8. Decorate the faces
While the coating is still tacky, press on two mini chocolate chips for eyes, one orange cone for a carrot nose, and three chips down the front for buttons. Wrap a fruit leather strip around the neck as a scarf.
9. Set and serve
Let the pops stand at room temperature for 20 minutes, or refrigerate 10 minutes, until the coating is fully hard and glossy. Serve cold or at cool room temperature so the snowmen hold their shape.
Delicious Variations
Chocolate Snowmen
Swap the white candy melts for dark chocolate and use white chocolate chips for the eyes and buttons, for a cocoa-dusted snowman look.
Red Velvet Pops
Use crumbled red velvet cake and cream cheese frosting, then dip in white coating so the red peeks through at the bite.
Peppermint Snow Pops
Stir 1/4 teaspoon peppermint extract into the coating and roll the dipped pops in crushed candy canes for a frosty, minty finish.
How to Store Snowman Cake Pops – Best Christmas Desserts – Recipes and Christmas Treats to
Refrigerator
Store finished pops in an airtight container in a single layer, separated by parchment, for up to 1 week. Keep them cool so the coating stays glossy and the cake does not sweat.
Freezer
Freeze undipped cake balls on a tray for 1 hour, then transfer to a freezer bag for up to 2 months. Fully decorated pops can also be frozen in a rigid container for up to 1 month; thaw in the refrigerator overnight.
Reheating
No reheating needed. If the coating looks dull, hold a pop under a warm lamp for a few seconds or dip it briefly in freshly melted coating to refresh the shine.
Frequently Asked Questions
Q: How far in advance can I make snowman cake pops?
You can make the undipped cake balls up to 2 months ahead and freeze them, or assemble the finished pops up to 1 week ahead and refrigerate them. Decorate them within a day of serving so the candy eyes and scarves stay crisp.
Q: Why are my cake pops falling off the stick?
The cake balls are usually too warm or too large. Chill them until firm, dip the stick tip in melted coating first, and keep each ball around 1 1/2 tablespoons so the stick can support the weight.
Q: Can I use chocolate chips instead of candy melts?
You can, but chocolate chips contain stabilizers that make them thick and prone to seizing. If you use them, chop them finely and stir in 1 teaspoon coconut oil so the coating flows smoothly around the pop.
Q: Do snowman cake pops need to be refrigerated?
Yes, because they contain cream cheese frosting and perishable cake. Keep them refrigerated in an airtight container and let them sit out no longer than 2 hours at a party.
Q: How do I get smooth, crack-free coating?
Dip fully chilled cake balls in coating that is 110 F to 115 F (43 C to 46 C), tap off the excess gently, and let them set at cool room temperature rather than in the refrigerator. Sudden cold makes the chocolate contract and crack.
Make a batch this weekend, set the kids at the table with a bowl of mini chocolate chips, and watch plain cake become a snowman army. Then share your version, your scarves, and your favorite holiday memory with me. Go, see, and connect.
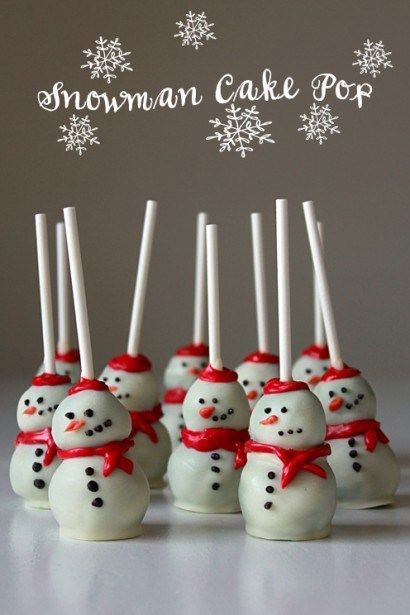
Snowman Cake Pops – Best Christmas Desserts – Recipes and Christmas Treats to
Snowman cake pops turn leftover cake and white chocolate into adorable no-bake Christmas treats kids and adults fight over at every holiday party.
🧂 Ingredients
- 4 cups (about 400g) crumbled vanilla or yellow cake, from a 9×13-inch baked cake or store-bought pound cake
- 3/4 cup (180g) cream cheese frosting, plus 1 to 2 tablespoons if needed
- 12 ounces (340g) white candy melts or white chocolate melting wafers
- 24 to 30 lollipop sticks (6-inch)
- 2 tablespoons orange candy melts or orange fondant, for carrot noses
- 1/4 cup (45g) mini chocolate chips, for eyes and buttons
- 1/4 cup (30g) red or green fruit leather or sour straws, for scarves
- 1 teaspoon coconut oil or shortening, for thinning the coating
📋 Instructions
- 1Crumble the cake — Break the cake into a large bowl and rub it between your fingers until no piece is bigger than a pea. You want an even, sandy crumb so the pops roll smooth.
- 2Bind with frosting — Add 3/4 cup frosting and mix with a sturdy spoon until the mixture holds when you squeeze a handful. If it crumbles, add frosting 1 tablespoon at a time.
- 3Roll the balls — Roll 1 1/2-tablespoon portions into balls, about the size of a walnut, and place them on a parchment-lined tray. You should get 24 to 30 balls.
- 4Chill until firm — Refrigerate the tray for 30 minutes, or freeze for 15 minutes, until the balls feel firm and cool to the touch. A soft center is the number one reason pops fall apart.
- 5Melt the coating — Melt the white candy melts in a microwave-safe bowl in 30-second bursts, stirring between each, until smooth at about 110 F to 115 F (43 C to 46 C). The coating should ribbon off the spoon without lumps.
- 6Insert the sticks — Dip the tip of each lollipop stick about 1/2 inch into the melted coating, then push it halfway into a chilled ball. Return the tray to the refrigerator for 10 minutes to set the glue.
- 7Dip the snowmen — Dip each pop straight down into the coating until the ball is fully submerged, lift, and let the excess drip back into the bowl. Tap your wrist gently and stand the pop upright in a styrofoam block.
- 8Decorate the faces — While the coating is still tacky, press on two mini chocolate chips for eyes, one orange cone for a carrot nose, and three chips down the front for buttons. Wrap a fruit leather strip around the neck as a scarf.
- 9Set and serve — Let the pops stand at room temperature for 20 minutes, or refrigerate 10 minutes, until the coating is fully hard and glossy. Serve cold or at cool room temperature so the snowmen hold their shape.

Aisha writes about travel and cultural immersion, sharing stories and tips from her journeys to off-the-beaten-path destinations. She emphasizes respectful tourism, budget-friendly adventures, and the importance of connecting with local communities.