I remember the first time I saw a brownie pinecone in a holiday magazine. I was instantly smitten, but also a little intimidated. Could I really make something that looked that fancy? As it turns out, yes! This recipe breaks it down into simple steps that anyone can follow. The result is a showstopper dessert that tastes as good as it looks.
Advertisements1
These brownie pinecones are made from a rich, fudgy brownie base that's shaped into a cone and studded with chocolate kisses to mimic the scales of a pinecone. They're perfect for Christmas parties, cookie exchanges, or as a fun activity with the kids. The best part? They're surprisingly easy to assemble, and you can make them ahead of time.
Why You'll Love This Recipe
About the Ingredients
1/2 cup (1 stick / 113g) unsalted butter, melted
Use unsalted butter so you can control the salt. If you only have salted, reduce the added salt to 1/8 teaspoon.
1 cup (200g) granulated sugar
Regular white sugar works best. For a deeper flavor, you can substitute half with light brown sugar, but the texture may be slightly softer.
2 large eggs, room temperature
Room temperature eggs blend more smoothly into the batter. If you're in a hurry, place them in a bowl of warm water for 5 minutes.
1 teaspoon vanilla extract
Pure vanilla extract gives the best flavor. You can use imitation vanilla, but pure is worth the splurge.
1/3 cup (40g) unsweetened cocoa powder
Dutch-processed cocoa gives a richer, more mellow chocolate flavor, but natural cocoa works too. I like using a good quality brand like Hershey's Special Dark.
1/2 cup (65g) all-purpose flour
Spoon the flour into the measuring cup and level it off with a knife, rather than scooping, to avoid a dry brownie.
1/4 teaspoon salt
Salt enhances the chocolate flavor and balances the sweetness. If using salted butter, omit this.
36 chocolate kisses, unwrapped
You'll need about 36 kisses per pinecone. You can use any brand, but the classic Hershey's Kisses work perfectly. For a festive twist, use candy cane kisses.
Optional: powdered sugar for dusting
A light dusting of powdered sugar mimics snow on the pinecone. Skip if you prefer a plain look.
Tips & Tricks
- Don't overbake the brownies. They should be just set in the center when you pull them out. Overbaking makes them dry and hard to shape.
- Use a small cookie scoop or your hands to form the brownie mixture into a cone shape. If the mixture is too sticky, lightly grease your hands with a little butter or oil.
- When pressing the kisses into the brownie, stagger them in rows, starting from the bottom and working your way up. Overlap each row slightly to create a realistic pinecone scale effect.
Pro Tips
Step-by-Step Instructions
1. Preheat and Prep
Preheat your oven to 350°F (175°C). Line an 8×8-inch baking pan with parchment paper, leaving overhang on two sides for easy removal.
2. Mix Wet Ingredients
In a medium bowl, whisk the melted butter and sugar together until well combined. Whisk in the eggs one at a time, then stir in the vanilla extract.
3. Add Dry Ingredients
Sift the cocoa powder, flour, and salt over the wet ingredients. Gently fold with a spatula until just combined. Be careful not to overmix, as this can make the brownies tough.
4. Bake the Brownies
Pour the batter into the prepared pan and spread evenly. Bake for 20-25 minutes, or until the edges are set and a toothpick inserted into the center comes out with a few moist crumbs. The top should be shiny and slightly cracked.
5. Cool and Crumble
Let the brownies cool completely in the pan on a wire rack. Once cool, lift them out using the parchment paper and place on a cutting board. Crumble the brownies into fine crumbs with your hands or a fork. There should be no large chunks.
6. Form the Cones
Take about 1/4 cup of the brownie crumbs and press them firmly into a cone shape, about 3 inches tall and 2 inches wide at the base. You can use your hands or shape them over a small paper cone. Place the cones on a baking sheet lined with parchment paper.
7. Add the Kisses
Starting at the bottom of each cone, press the chocolate kisses into the brownie, overlapping them slightly like scales. Work in rows, moving upward. For the top, place a single kiss at the tip. Place the finished pinecones in the refrigerator for 15 minutes to set.
8. Serve and Enjoy
Dust with powdered sugar (if using) just before serving. These are best at room temperature, so take them out of the fridge about 10 minutes before serving.
Delicious Variations
Peppermint Pinecones
Use crushed peppermint candy mixed into the brownie crumbs and top with a drizzle of white chocolate.
Nutty Pinecones
Add 1/2 cup of finely chopped pecans or walnuts to the brownie mixture for extra crunch.
White Chocolate Pinecones
Instead of chocolate kisses, use white chocolate kisses or white chocolate chips for a snowy look.
How to Store Brownie Pinecone Recipe
Refrigerator
Store in an airtight container in the refrigerator for up to 1 week. The chocolate kisses may soften slightly, but they will still be delicious.
Freezer
You can freeze the assembled pinecones for up to 3 months. Place them on a baking sheet in the freezer until solid, then transfer to a freezer-safe bag. Thaw in the refrigerator overnight before serving.
Reheating
These are best served at room temperature. If they've been refrigerated, let them sit out for 10-15 minutes before serving. Do not microwave, as the chocolate kisses will melt.
Frequently Asked Questions
Q: Can I use a boxed brownie mix for this recipe?
Yes, you can absolutely use a boxed mix! Just prepare the brownies according to the package directions for an 8×8 pan, then cool and crumble. This is a great shortcut.
Q: How do I keep the chocolate kisses from falling off?
The kisses will stay in place if you press them firmly into the brownie mixture. Chilling the pinecones after assembly helps them set. If you're serving them somewhere warm, you can use a tiny dab of melted chocolate to glue them on.
Q: Can I make these ahead of time?
Yes! You can make the pinecones up to 3 days ahead and store them in an airtight container in the refrigerator. Add the powdered sugar right before serving.
Q: What if my brownie mixture is too dry and won't hold together?
If the mixture is crumbly, add a little bit of melted butter or milk, one teaspoon at a time, until it holds together when pressed. The brownies should be moist enough, but if they were overbaked, you may need a little help.
Q: Can I use something other than chocolate kisses?
Absolutely! You can use chocolate chips, peanut butter cups, or even almonds for a different look. Just make sure they are small enough to fit on the cone.
I hope you love making these adorable Brownie Pinecones! They're sure to be a hit at your holiday gathering. If you try them, let me know in the comments below. I'd love to hear how they turned out!
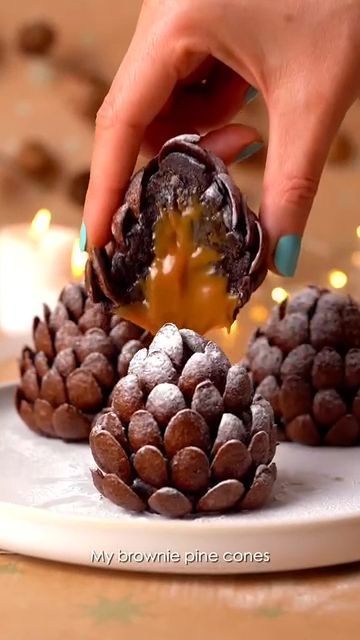
Brownie Pinecone Recipe
These easy Brownie Pinecones are the cutest Christmas dessert! Rich fudgy brownies shaped like pinecones, perfect for holiday parties.
🧂 Ingredients
- 1/2 cup (1 stick / 113g) unsalted butter, melted
- 1 cup (200g) granulated sugar
- 2 large eggs, room temperature
- 1 teaspoon vanilla extract
- 1/3 cup (40g) unsweetened cocoa powder
- 1/2 cup (65g) all-purpose flour
- 1/4 teaspoon salt
- 36 chocolate kisses, unwrapped
- Optional: powdered sugar for dusting
📋 Instructions
- 1Preheat and Prep — Preheat your oven to 350°F (175°C). Line an 8×8-inch baking pan with parchment paper, leaving overhang on two sides for easy removal.
- 2Mix Wet Ingredients — In a medium bowl, whisk the melted butter and sugar together until well combined. Whisk in the eggs one at a time, then stir in the vanilla extract.
- 3Add Dry Ingredients — Sift the cocoa powder, flour, and salt over the wet ingredients. Gently fold with a spatula until just combined. Be careful not to overmix, as this can make the brownies tough.
- 4Bake the Brownies — Pour the batter into the prepared pan and spread evenly. Bake for 20-25 minutes, or until the edges are set and a toothpick inserted into the center comes out with a few moist crumbs. The top should be shiny and slightly cracked.
- 5Cool and Crumble — Let the brownies cool completely in the pan on a wire rack. Once cool, lift them out using the parchment paper and place on a cutting board. Crumble the brownies into fine crumbs with your hands or a fork. There should be no large chunks.
- 6Form the Cones — Take about 1/4 cup of the brownie crumbs and press them firmly into a cone shape, about 3 inches tall and 2 inches wide at the base. You can use your hands or shape them over a small paper cone. Place the cones on a baking sheet lined with parchment paper.
- 7Add the Kisses — Starting at the bottom of each cone, press the chocolate kisses into the brownie, overlapping them slightly like scales. Work in rows, moving upward. For the top, place a single kiss at the tip. Place the finished pinecones in the refrigerator for 15 minutes to set.
- 8Serve and Enjoy — Dust with powdered sugar (if using) just before serving. These are best at room temperature, so take them out of the fridge about 10 minutes before serving.

Maya writes about sustainable living and zero-waste practices, focusing on small, actionable changes for everyday life. She shares practical tips on reducing plastic, composting, and mindful consumption, drawn from her own experiments at home.