I still remember the first time I tried a cherry pistachio cheesecake – it was at a little café in Portland, and I was so smitten that I ordered a second slice before even finishing the first. The combination of tart cherries and rich, nutty pistachios felt like a match made in heaven, but the price tag… not so much. So I went home determined to recreate that magic in my own kitchen, and after many happy experiments, this slice was born.
Advertisements1
This isn't just any cheesecake – it's a no-bake wonder that comes together in minutes, making it perfect for hot summer days when you don't want to turn on the oven. The crust is a buttery pistachio shortbread, the filling is lusciously creamy and tangy, and the topping is a jewel-toned cherry compote that makes every slice look like a work of art. Whether you're a seasoned baker or a kitchen newbie, this recipe is forgiving and foolproof.
So grab your mixing bowl, and let's make something beautiful together. I promise you'll be the hero of your next gathering.
Why You'll Love This Recipe
About the Ingredients
1 1/2 cups (190g) shelled pistachios, plus extra for garnish
Use unsalted pistachios for the crust to control salt. If you only have salted, skip the added salt in the crust. Look for pre-shelled ones to save time.
1/4 cup (50g) granulated sugar
Regular white sugar works best for the crust. You can substitute coconut sugar for a deeper flavor, but it may alter the color slightly.
1/2 cup (115g) unsalted butter, melted
Salted butter works too – just reduce the added salt in the crust to a pinch. For a dairy-free version, use vegan butter.
1/4 teaspoon salt
If your pistachios are salted, omit this. Kosher or sea salt both work.
16 oz (450g) cream cheese, softened
Use full-fat cream cheese for the best texture. Neufchâtel (1/3 less fat) works but may result in a slightly softer set.
1/2 cup (100g) granulated sugar
For the filling. You can reduce to 1/3 cup if you prefer a less sweet cheesecake.
1 teaspoon vanilla extract
Pure vanilla extract gives the best flavor. You can use vanilla bean paste for a more intense vanilla flavor.
1 cup (240ml) heavy cream
Heavy cream or whipping cream (35% fat) is essential for the whipped topping. Chill it well before whipping for best volume.
2 cups (300g) pitted cherries (fresh or frozen)
If using frozen, thaw and drain them well to avoid excess liquid. Sour cherries are fantastic here, but sweet Bing cherries work too.
2 tablespoons (30ml) lemon juice
Fresh lemon juice brightens the cherry topping. You can use lime juice for a different citrus note.
2 tablespoons (25g) granulated sugar
For the cherry topping. Adjust to taste depending on the sweetness of your cherries.
1 tablespoon (8g) cornstarch mixed with 2 tablespoons (30ml) water
This slurry thickens the cherry compote. You can use arrowroot powder as a substitute.
Tips & Tricks
- Make sure your cream cheese is truly softened – leave it out for at least 1 hour. Cold cream cheese creates lumps that won't smooth out.
- When folding the whipped cream into the cream cheese mixture, use a gentle figure-eight motion. Overmixing deflates the air and makes the cheesecake dense.
- Chill the cheesecake for at least 4 hours, but overnight is better. If you're in a hurry, you can freeze it for 2 hours, but the texture won't be as silky.
Pro Tips
Step-by-Step Instructions
1. Prepare the Crust
In a food processor, pulse the pistachios until finely ground. Add sugar and salt, then pulse to combine. Add melted butter and pulse until the mixture resembles wet sand. Press firmly into the bottom of an 8×8-inch (20x20cm) baking pan lined with parchment paper. Chill in the fridge while you make the filling.
2. Whip the Cream
In a chilled bowl, beat the heavy cream until stiff peaks form. Set aside in the fridge while you make the cream cheese mixture.
3. Beat Cream Cheese
In a large bowl, beat the softened cream cheese and sugar until smooth and creamy. Add vanilla and mix until combined. Scrape down the sides as needed.
4. Fold in Cream
Gently fold the whipped cream into the cream cheese mixture in two additions. Use a rubber spatula and fold until just combined – no streaks remain.
5. Assemble and Chill
Pour the filling over the chilled crust and smooth the top with an offset spatula. Tap the pan lightly on the counter to release air bubbles. Cover with plastic wrap and refrigerate for at least 4 hours, preferably overnight, until set.
6. Make Cherry Topping
In a saucepan over medium heat, combine cherries, lemon juice, and sugar. Cook for 5-7 minutes until the cherries release their juices and soften. Stir in the cornstarch slurry and cook for another 2-3 minutes, until the mixture thickens and becomes glossy. Remove from heat and let cool completely.
7. Top and Serve
Once the cheesecake is set, spread the cooled cherry topping evenly over the surface. Sprinkle with chopped pistachios. Refrigerate for at least 30 minutes before slicing. Slice with a hot knife and serve chilled.
Delicious Variations
Chocolate Cherry
Add 1/2 cup (85g) of mini chocolate chips to the filling and drizzle melted chocolate over the finished cheesecake.
Citrus Twist
Replace the lemon juice with orange juice and add 1 teaspoon of orange zest to the filling for a bright, sunny flavor.
Gluten-Free
Use gluten-free graham cracker crumbs instead of pistachios for the crust, or ensure your pistachios are certified gluten-free (they naturally are).
How to Store Cherry Pistachio Cheesecake Slice
Refrigerator
Store in an airtight container in the fridge for up to 5 days. The crust may soften slightly but it will still be delicious.
Freezer
Wrap the entire cheesecake (or individual slices) tightly in plastic wrap and then foil. Freeze for up to 2 months. Thaw overnight in the fridge before serving.
Reheating
This is a no-bake dessert – serve chilled. If you prefer a slightly softer texture, let it sit at room temperature for 10-15 minutes before slicing.
Frequently Asked Questions
Q: Can I use a springform pan instead of a square pan?
Yes, you can use an 8-inch (20cm) round springform pan. The baking time remains the same, but you may need to adjust the quantity of crust slightly. Simply press the crust up the sides for a more traditional look.
Q: Can I make this cheesecake vegan?
Absolutely! Use vegan cream cheese and vegan butter, and substitute the heavy cream with full-fat coconut cream (chilled). The texture will be slightly different but still creamy and delicious. Just make sure to refrigerate long enough to set.
Q: How do I know when the cheesecake is set?
The cheesecake is set when the edges are firm and the center is slightly jiggly but not liquid. After chilling for 4 hours, it should be firm enough to slice cleanly. If it's still soft, chill for another hour.
Q: Can I use frozen cherries for the topping?
Yes, frozen cherries work great. Thaw them first and drain off any excess liquid to avoid a watery topping. You may need to adjust the sugar depending on the sweetness of the cherries.
Q: Can I skip the crust to make it gluten-free?
Yes, you can make a crustless cheesecake by simply pouring the filling into a parchment-lined pan and skipping the crust. It will still set and taste wonderful, but you'll lose the nutty crunch.
I hope you love this cherry pistachio cheesecake slice as much as I do! If you make it, tag me on Instagram @sofriramirez – I'd love to see your beautiful creations. And don't forget to share it with someone who makes your heart smile. Happy baking! You're doing better than you think.
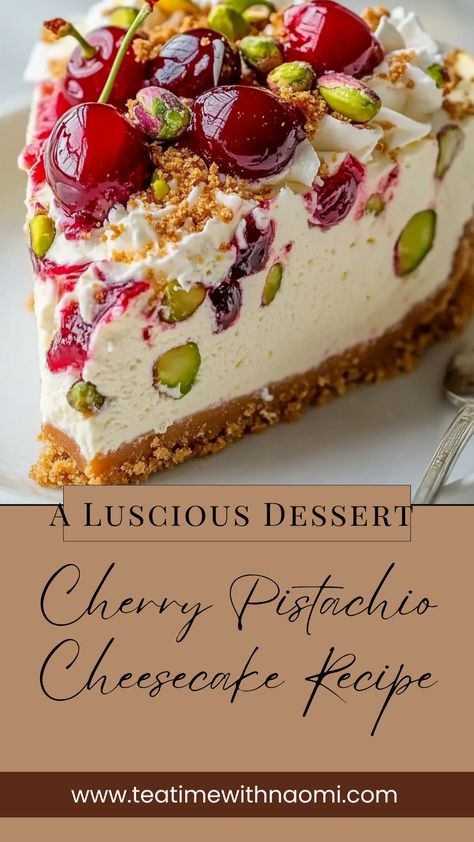
Cherry Pistachio Cheesecake Slice
Creamy no-bake cherry pistachio cheesecake slice with a buttery crust and vibrant cherry topping – a stunning, easy dessert for any occasion.
🧂 Ingredients
- 1 1/2 cups (190g) shelled pistachios, plus extra for garnish
- 1/4 cup (50g) granulated sugar
- 1/2 cup (115g) unsalted butter, melted
- 1/4 teaspoon salt
- 16 oz (450g) cream cheese, softened
- 1/2 cup (100g) granulated sugar
- 1 teaspoon vanilla extract
- 1 cup (240ml) heavy cream
- 2 cups (300g) pitted cherries (fresh or frozen)
- 2 tablespoons (30ml) lemon juice
- 2 tablespoons (25g) granulated sugar
- 1 tablespoon (8g) cornstarch mixed with 2 tablespoons (30ml) water
📋 Instructions
- 1Prepare the Crust — In a food processor, pulse the pistachios until finely ground. Add sugar and salt, then pulse to combine. Add melted butter and pulse until the mixture resembles wet sand. Press firmly into the bottom of an 8×8-inch (20x20cm) baking pan lined with parchment paper. Chill in the fridge while you make the filling.
- 2Whip the Cream — In a chilled bowl, beat the heavy cream until stiff peaks form. Set aside in the fridge while you make the cream cheese mixture.
- 3Beat Cream Cheese — In a large bowl, beat the softened cream cheese and sugar until smooth and creamy. Add vanilla and mix until combined. Scrape down the sides as needed.
- 4Fold in Cream — Gently fold the whipped cream into the cream cheese mixture in two additions. Use a rubber spatula and fold until just combined – no streaks remain.
- 5Assemble and Chill — Pour the filling over the chilled crust and smooth the top with an offset spatula. Tap the pan lightly on the counter to release air bubbles. Cover with plastic wrap and refrigerate for at least 4 hours, preferably overnight, until set.
- 6Make Cherry Topping — In a saucepan over medium heat, combine cherries, lemon juice, and sugar. Cook for 5-7 minutes until the cherries release their juices and soften. Stir in the cornstarch slurry and cook for another 2-3 minutes, until the mixture thickens and becomes glossy. Remove from heat and let cool completely.
- 7Top and Serve — Once the cheesecake is set, spread the cooled cherry topping evenly over the surface. Sprinkle with chopped pistachios. Refrigerate for at least 30 minutes before slicing. Slice with a hot knife and serve chilled.

Sofia writes about parenting and family wellness, exploring the messy, joyful reality of raising kids. She offers relatable stories and practical advice on everything from sleep training to managing screen time, always with a dose of humor.